Drawing waveforms using AudioKit and CoreGraphics
Couple of notes to get started:
- For the audio file, I am going to use a song by Scott Holmes Music from the Free Music Archive. I have renamed the file
Upbeat Funk Pop.mp3 - I have added the file to the bundle in my sample project. This could be done just as easily for something loaded from a
URLRequestor even recorded locally. - I am making some assumptions about using screen width and height. These numbers can be adjusted as needed.
- There is some UIKit code here but I am running it in a Catalyst app, so the screenshots are from macOS.
- Each code block below is intended to run in the same function. I have a completed example at the bottom.
There are three main steps to this approach --- getting our audio file/data, using AudioKit to get the amplitude samples, and then using CoreGraphics to draw the actual waveform.
Step 1: Read the audio file
First, let's get the file from the bundle and get an AVAudioFile with it:
1guard let url = Bundle.main.url(forResource: "Upbeat Funk Pop", withExtension: "mp3") else { return nil }
2guard let audioFile = try? AVAudioFile(forReading: url) else { return nil }
Step 2: Collect amplitude samples
Next, we want to get the amplitude samples from that AVAudioFile. This is where AudioKit comes into play. Take note that getData will return two arrays, one for the left channel and one for the right channel. We are only interested in the first channel here. Additionally, we are using UIScreen.main.bounds.size.width as the width for the image we will generate. This is used with getData to ensure we get one sample value per point on the screen. We could generate an image wider than the screen if we needed to scroll, but as it is this will only be one sample per point across the width of the screen.
1let waveformDataRequest = WaveformDataRequest(audioFile: audioFile)
2let width: Double = UIScreen.main.bounds.size.width
3
4guard let samples = waveformDataRequest.getData(with: Int(width))?.first else { return nil }
Step 3: Draw the waveform
Now we can begin to set up our CGContext to handle drawing the actual waveform. drawAreaHeight height here represents
half of the area we will use to draw. The purpose of this is we will draw amplitude modulation both above and
below a middle point in the image. We will essentially mirror the waveform to the bottom half to fill it out. Example:
1let yCenter: CGFloat = UIScreen.main.bounds.size.height / 2
2let contextSize = CGSize(width: width, height: yCenter * 2)
3UIGraphicsBeginImageContext(contextSize)
4
5let context = UIGraphicsGetCurrentContext()
6context?.setStrokeColor(UIColor(white: 0.3, alpha: 1).cgColor)
7context?.setShouldAntialias(false)
Here is the fun part where we begin to draw the waveform. We will move forward on the x-axis one point per
sample (index) and will draw the desired height of the sample both above the vertical center, and below
the vertical center.
1for (index, sample) in samples.enumerated() {
2    let sampleValue = CGFloat(sample)
3    let sampleDrawDistance = yCenter * sampleValue
4    let startPoint = CGPoint(x: CGFloat(index), y: yCenter - sampleDrawDistance)
5    let endPoint = CGPoint(x: CGFloat(index), y: yCenter + sampleDrawDistance)
6    context?.move(to: startPoint)
7    context?.addLine(to: endPoint)
8}
Here is a video to demonstrate the direction we are drawing here. This is intentionally slowed down. The drawing happens pretty close to instantly in real use. This is just to show how we are drawing one vertical line at a time, each line matching one of the amplitude samples.
Once we have drawn our samples, we need to stroke the path and then we can grab an image from the CGContext and end the context.
1context?.strokePath()
2
3let image = UIGraphicsGetImageFromCurrentImageContext()
4UIGraphicsEndImageContext()
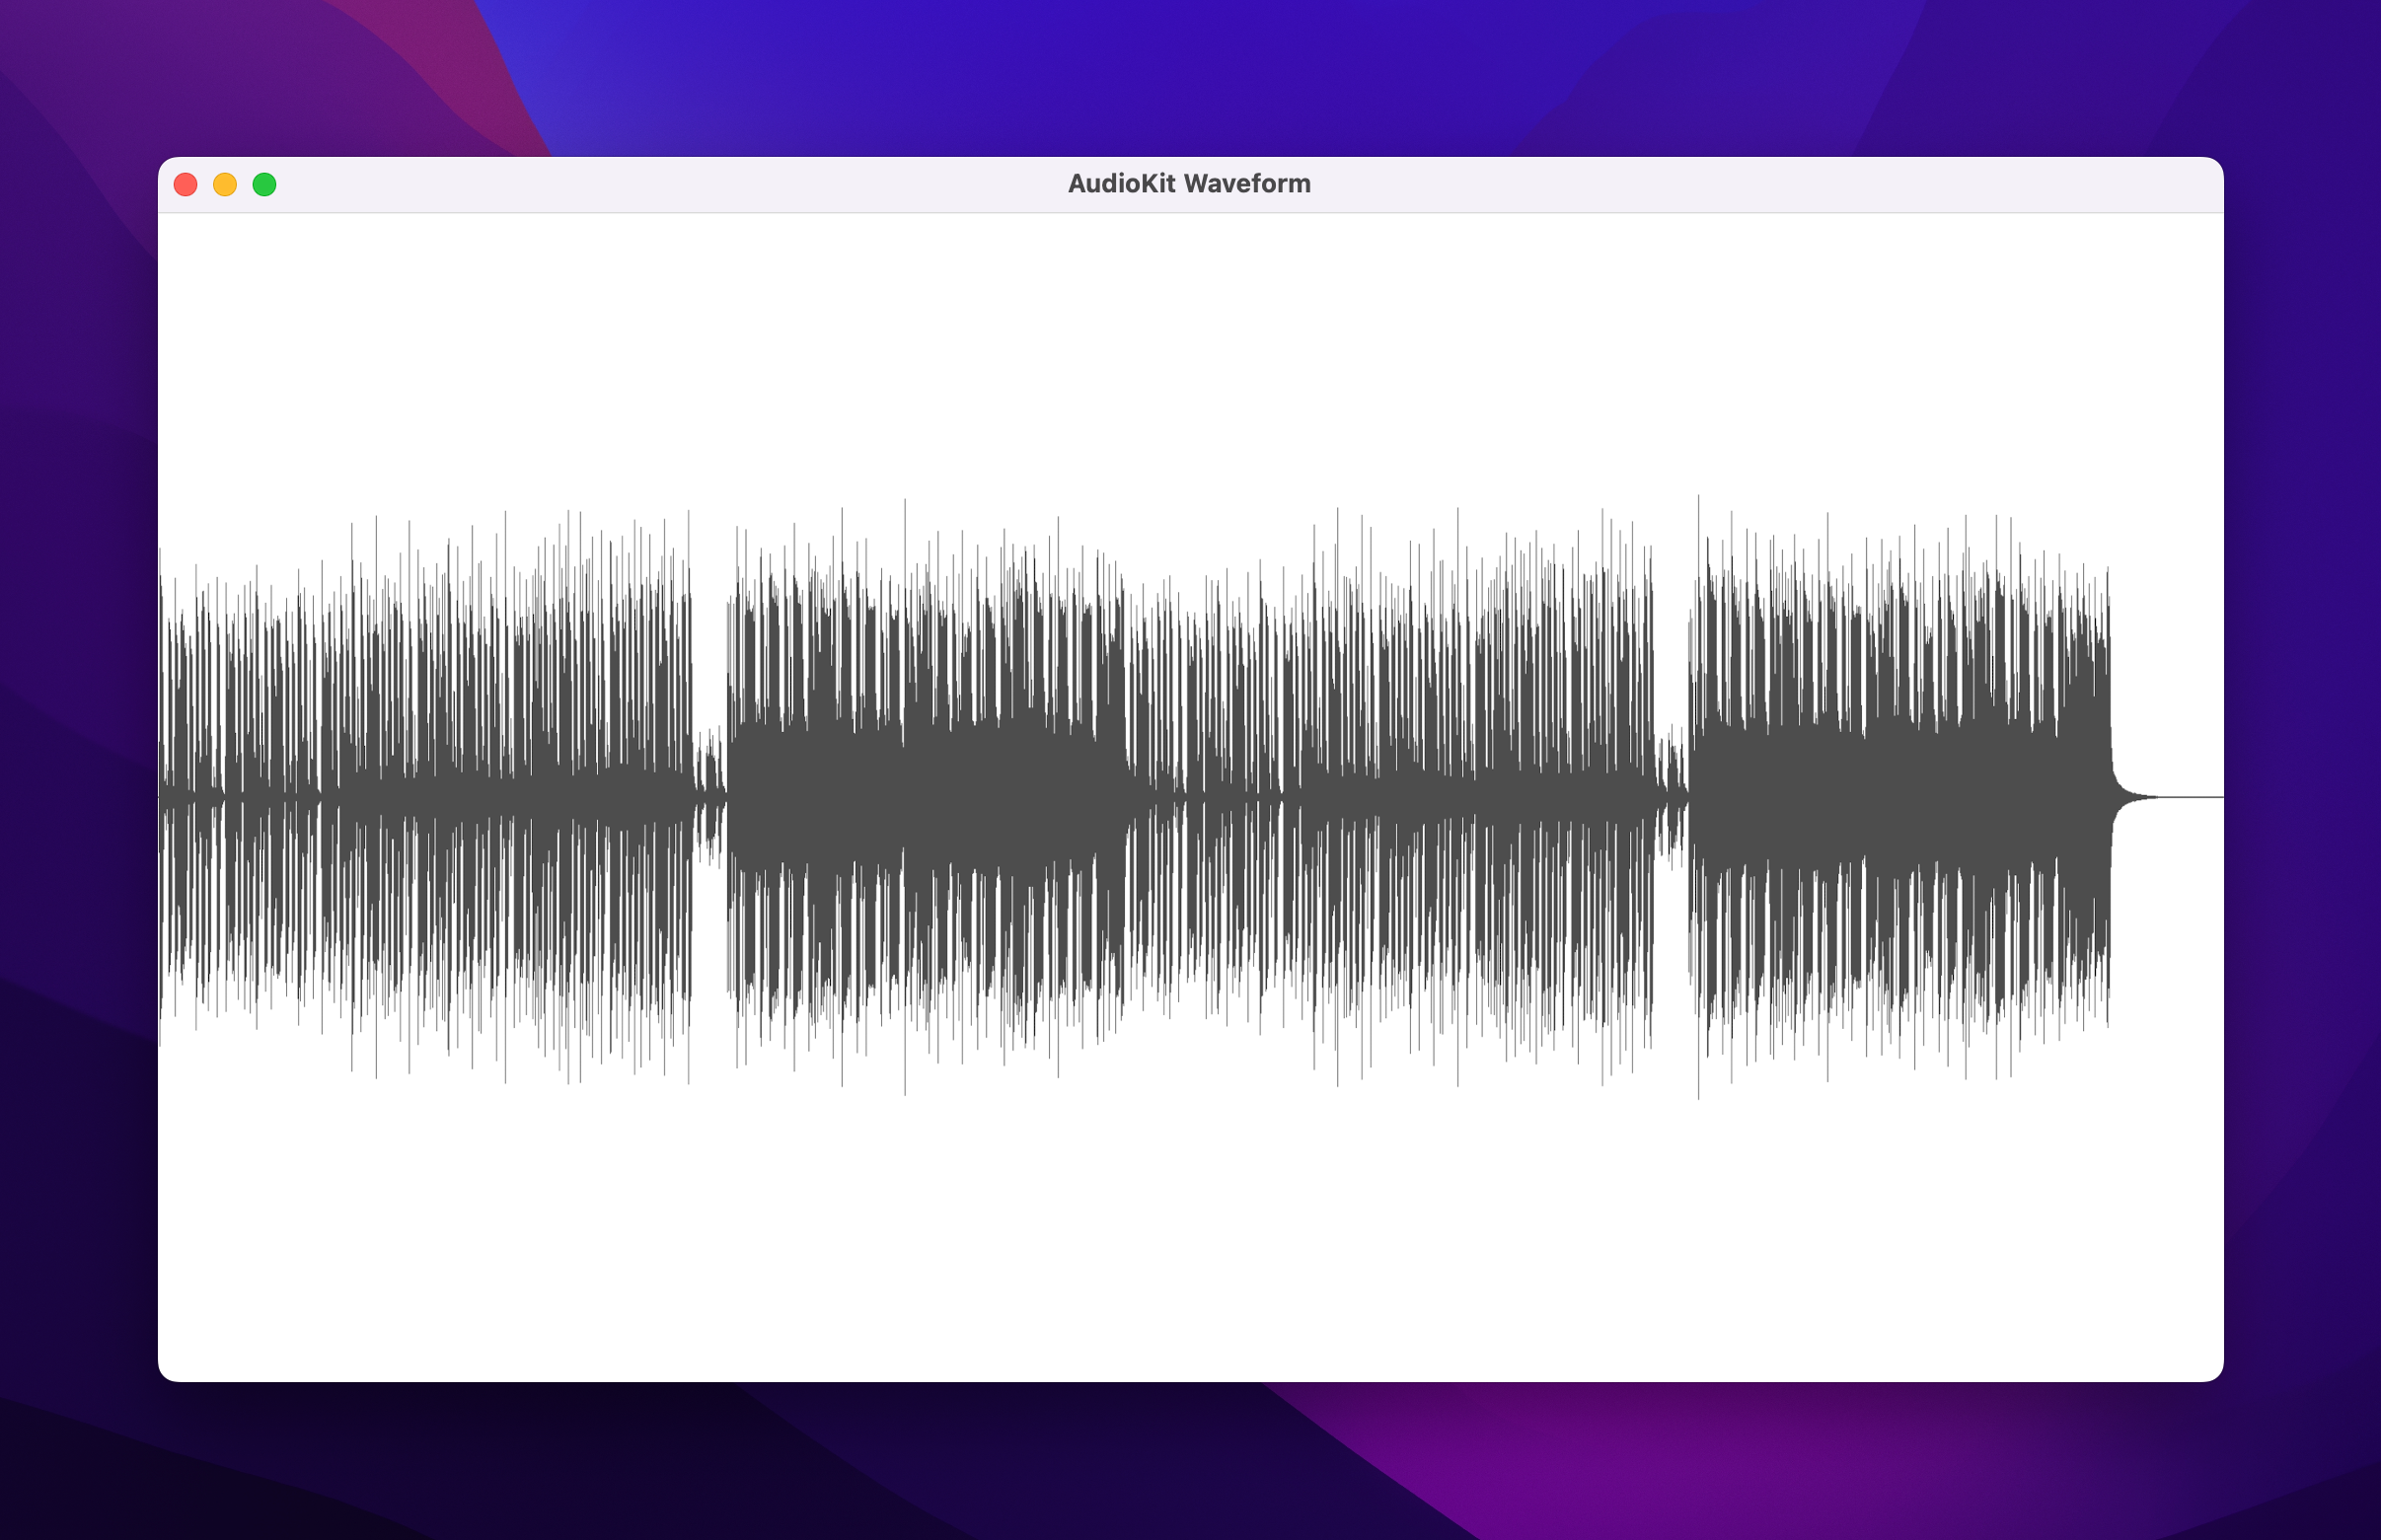
Here will be the completed waveform!
Bonus
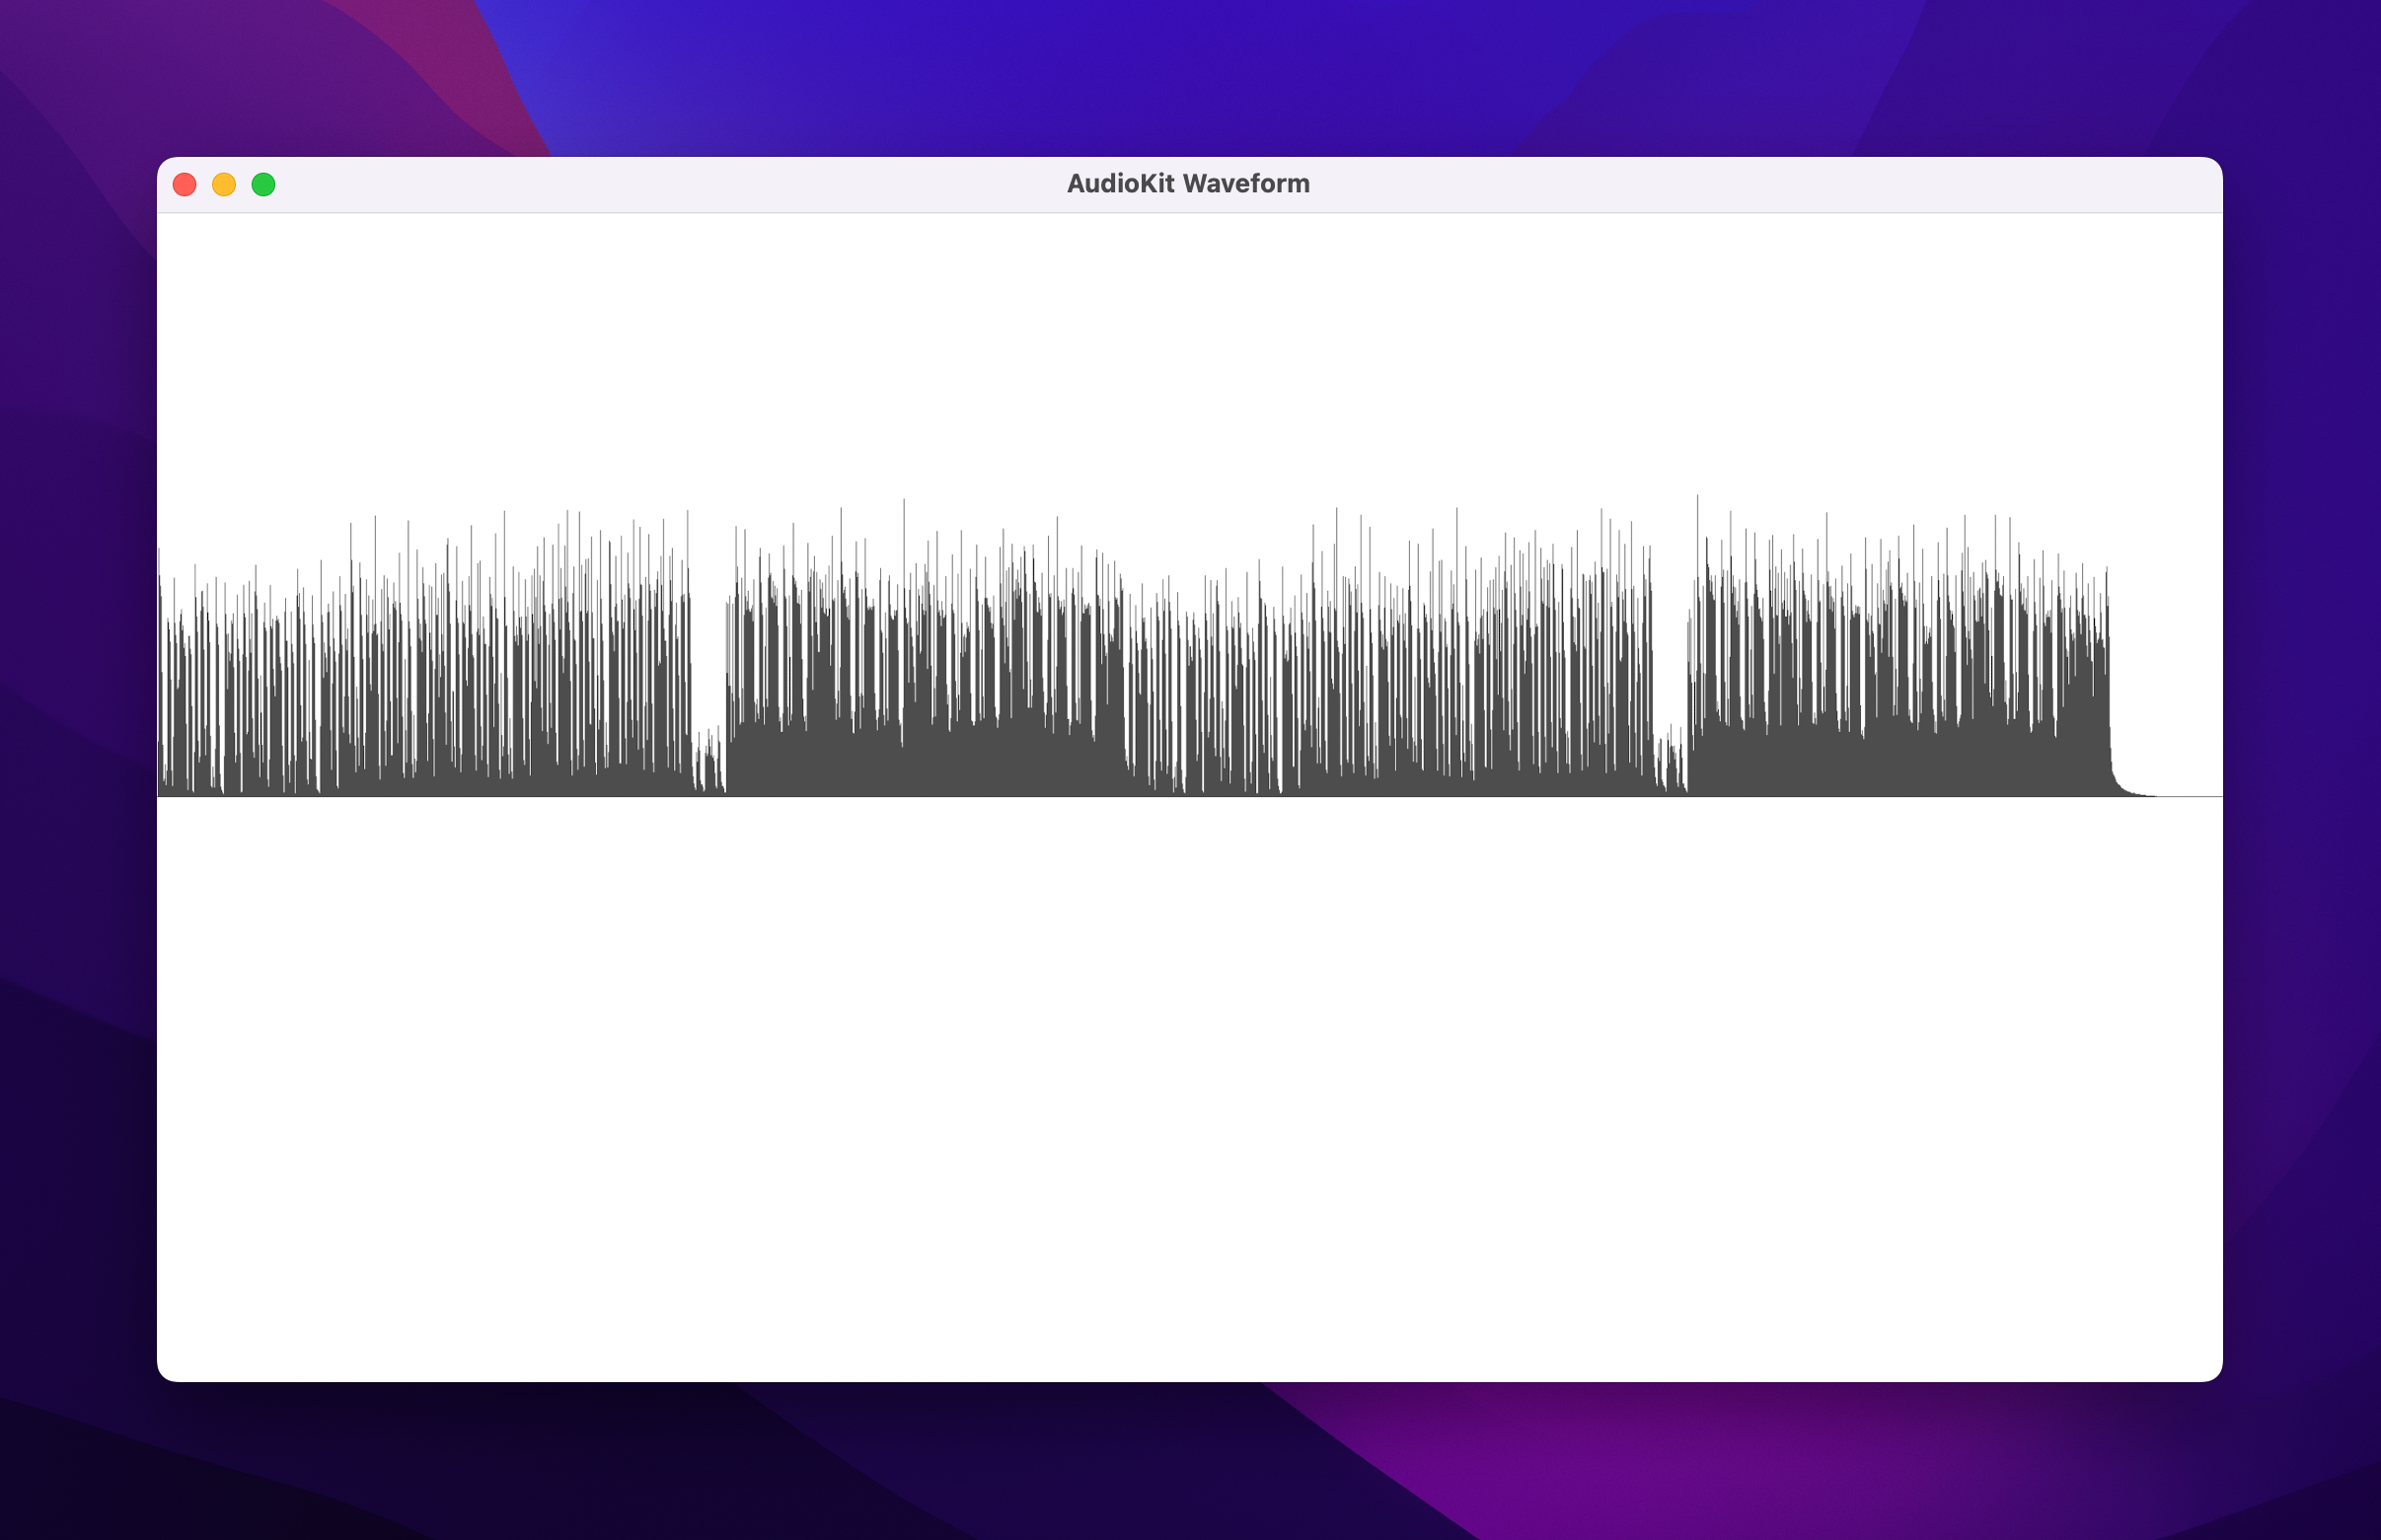
Circling back to the idea of yCenter and how we mirrored the lines around a that point in the
image, we could have stopped at the vertical center and only drawn the top half of the waveform:
1let startPoint = CGPoint(x: CGFloat(index), y: yCenter - sampleDrawDistance)
2let endPoint = CGPoint(x: CGFloat(index), y: yCenter)
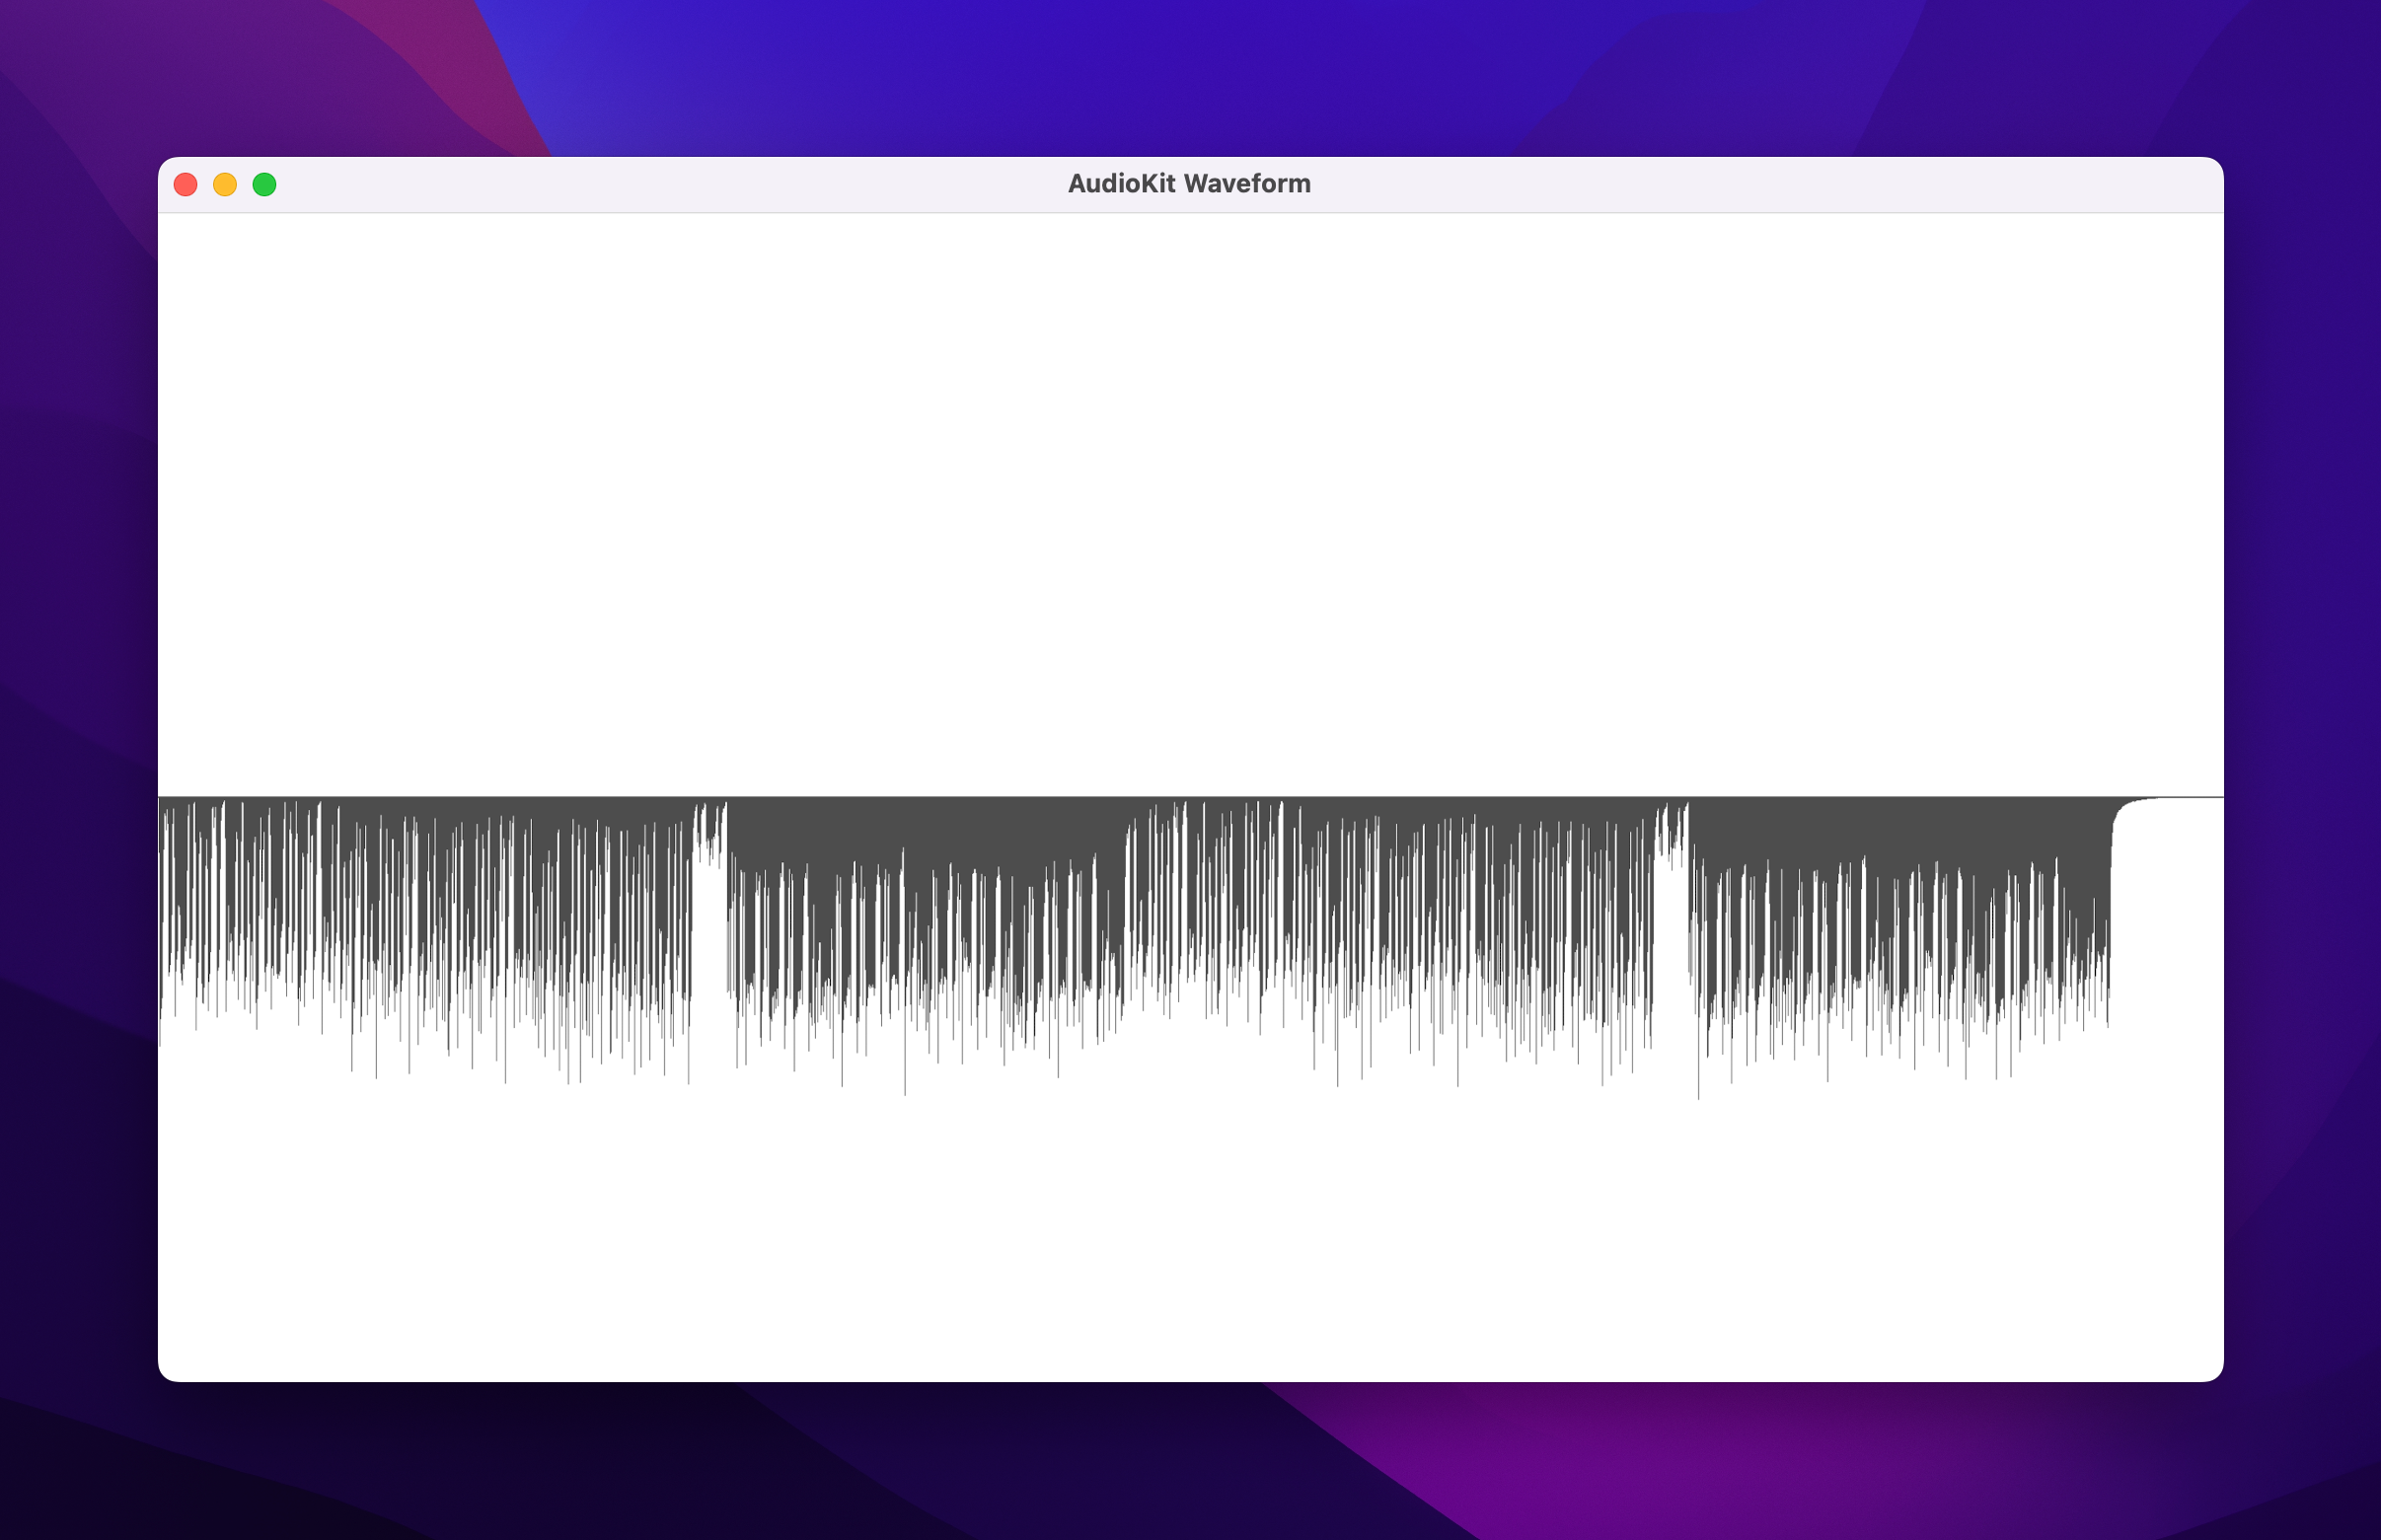
Or even started at yCenter and only drawn the bottom half:
1let startPoint = CGPoint(x: CGFloat(index), y: yCenter)
2let endPoint = CGPoint(x: CGFloat(index), y: yCenter + sampleDrawDistance)
Completed code
1static func drawWaveform() -> UIImage? {
2    guard let url = Bundle.main.url(forResource: "Upbeat Funk Pop", withExtension: "mp3") else { return nil }
3    guard let audioFile = try? AVAudioFile(forReading: url) else { return nil }
4
5    let waveformDataRequest = WaveformDataRequest(audioFile: audioFile)
6    let width: Double = UIScreen.main.bounds.size.width
7
8    guard let samples = waveformDataRequest.getData(with: Int(width))?.first else { return nil }
9
10    let yCenter: CGFloat = UIScreen.main.bounds.size.height / 2
11    let contextSize = CGSize(width: width, height: yCenter * 2)
12    UIGraphicsBeginImageContext(contextSize)
13
14    let context = UIGraphicsGetCurrentContext()
15    context?.setStrokeColor(UIColor(white: 0.3, alpha: 1).cgColor)
16    context?.setShouldAntialias(false)
17
18    for (index, sample) in samples.enumerated() {
19        let sampleValue = CGFloat(sample)
20        let sampleDrawDistance = yCenter * sampleValue
21        let startPoint = CGPoint(x: CGFloat(index), y: yCenter - sampleDrawDistance)
22        let endPoint = CGPoint(x: CGFloat(index), y: yCenter + sampleDrawDistance)
23        context?.move(to: startPoint)
24        context?.addLine(to: endPoint)
25    }
26
27    context?.strokePath()
28
29    let image = UIGraphicsGetImageFromCurrentImageContext()
30    UIGraphicsEndImageContext()
31
32    return image
33}
Last note --- there are use cases for scaling the sample values if all of the samples are very low. I have not included an example of that here but am open to adding it.
Next: Useful Ansible plays for Raspberry Pis